Cookie Monster Cookies – Fun Blue Treat Recipe
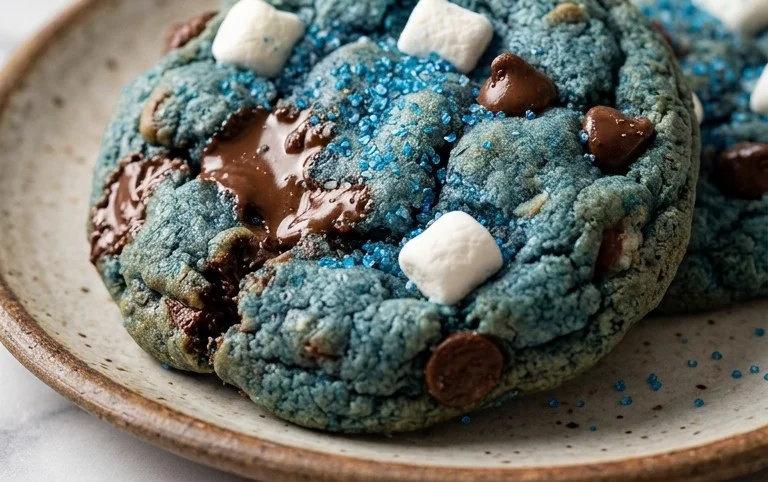
Cookie Monster Cookies bring a whole lot of fun to baking, with their bright blue color and chunks of cookies and chocolate that even the most serious cookie lover can’t resist. These cookies are a playful nod to everyone’s favorite furry, blue monster, packed with all the best parts of a classic chocolate chip cookie, but with a special, silly twist. They’re perfect for themed parties, a fun weekend project with kids, or anytime you just want to add a splash of color and joy to your day. The secret to their irresistible charm lies in the combination of soft, chewy dough, generous amounts of chocolate chips, crunchy cookie bits, and that surprise whole Oreo hidden inside. Making these blue wonders is as much fun as eating them, and the process is straightforward enough for bakers of all levels.
Making the Dough
Cream the Butter and Sugars: In a large mixing bowl, combine the softened unsalted butter, granulated sugar, and light brown sugar. Using an electric mixer or a sturdy whisk, beat these together until the mixture is light and fluffy. This process incorporates air into the dough, which helps with the cookie’s texture. Make sure the butter is truly softened – not melted, but yielding easily to the touch. If your butter is too cold, it won’t cream properly and your cookies might turn out dense. If it’s melted, they’ll spread too much in the oven.
Add Egg and Vanilla: Beat in the large egg until it’s fully incorporated. Then, stir in the vanilla extract. Make sure the egg is at room temperature; a cold egg can cause the butter mixture to seize up. If you forget to take your egg out of the fridge in time, you can warm it up by placing it in a bowl of warm water for about 5-10 minutes.
Color the Dough: Now for the fun part! Add a few drops of blue gel food coloring to the dough. Start with a small amount and mix it in. You can always add more to achieve a deeper, more vibrant blue. Gel food coloring is concentrated, so a little goes a long way. Be careful not to add too much liquid food coloring, as it can affect the dough’s consistency.

Ingredients:
- 120 g (1/2 cup) unsalted butter, softened
- 100 g (1/2 cup) granulated sugar
- 50 g (1/4 cup) light brown sugar
- 1 large egg, room temperature
- 1 tsp vanilla extract
- Blue gel food coloring
- 230 g (1 3/4 cups) all-purpose flour
- Pinch of salt
- 1 tsp baking powder
- 1/2 tsp baking soda
- 40 g (1/4 cup) dark chocolate chips
- 40 g (1/4 cup) white chocolate chips
- 30 g (1/4 cup) crushed mini cookies
- 3 Oreos, roughly chopped
- 12 whole Oreos, for stuffing
Cookie Monster Cookies
These cookies capture the iconic blue fuzz and the love for cookies that Cookie Monster is famous for, but with a delicious, homemade twist. They are surprisingly simple to make and are guaranteed to be a hit with anyone who has a soft spot for the lovable Muppet. The combination of soft, chewy cookie dough, melty chocolate chips, and crunchy cookie bits, all wrapped around a whole Oreo, creates a truly satisfying treat. Getting the blue color just right is part of the fun, and don’t worry if it’s not perfectly uniform; Cookie Monster himself is a bit messy!
Making the Dough
- Cream the Butter and Sugars: In a large mixing bowl, combine the softened unsalted butter, granulated sugar, and light brown sugar. Using an electric mixer or a sturdy whisk, beat these together until the mixture is light and fluffy. This process incorporates air into the dough, which helps with the cookie’s texture. Make sure the butter is truly softened – not melted, but yielding easily to the touch. If your butter is too cold, it won’t cream properly. Scrape down the sides of the bowl a couple of times to ensure everything is well combined. This usually takes about 2-3 minutes of vigorous mixing.
- Add Wet Ingredients: Beat in the room temperature egg and the vanilla extract until fully incorporated. The room temperature egg helps it emulsify better with the butter and sugar mixture, leading to a smoother dough. If you forget to take your egg out of the fridge in time, you can place it in a small bowl of warm water for about 5-10 minutes. After adding the egg and vanilla, the mixture might look a little curdled, but don’t worry; this will smooth out when you add the dry ingredients.
- Coloring the Dough: Now for the fun part! Add a few drops of blue gel food coloring to the wet ingredients. Gel food coloring is best because it’s concentrated and won’t add extra liquid to your dough, which could affect the texture. Start with a few drops and mix it in. Continue adding drops and mixing until you achieve the desired Cookie Monster blue. Remember that the color will lighten slightly when you add the dry ingredients and further when the cookies bake. It’s better to start with a slightly deeper blue than you think you need.
- Combine Dry Ingredients: In a separate medium bowl, whisk together the all-purpose flour, pinch of salt, baking powder, and baking soda. Whisking the dry ingredients before adding them to the wet ingredients ensures that the leavening agents (baking powder and soda) and salt are evenly distributed throughout the flour, preventing pockets of bitterness or uneven rising in your cookies. A pinch of salt is essential even in sweet recipes; it balances the sweetness and enhances the overall flavor.
- Form the Cookies: Gradually add the dry ingredients to the wet ingredients, mixing on low speed or by hand until just combined. Be careful not to overmix the dough at this stage. Overmixing can develop the gluten in the flour too much, resulting in tough cookies. Once the flour is mostly incorporated, add the dark chocolate chips, white chocolate chips, crushed mini cookies, and chopped Oreos. Fold these in gently with a spatula until they are evenly distributed throughout the blue dough. This is where the delicious chunky texture comes from.
- Stuffing the Cookies: For each cookie, scoop out a portion of the blue dough, about 2-3 tablespoons worth, depending on how large you want your cookies. Flatten this dough in your hand to create a disc. Place one whole Oreo cookie in the center of the disc. Then, take another piece of dough and carefully wrap it around the whole Oreo, ensuring it’s completely enclosed. Pinch the edges of the dough together to seal the Oreo inside. Roll the dough gently in your hands to form a smooth ball. Repeat this process for all 12 cookies.
- Chilling and Baking: Place the formed cookie balls onto a baking sheet lined with parchment paper, leaving a few inches between them as they will spread. Cover the baking sheet with plastic wrap and refrigerate the cookies for at least 30 minutes, or up to 2 days. Chilling the dough is a critical step for several reasons. It allows the fats to firm up, which prevents the cookies from spreading too much during baking, giving them a thicker, chewier texture. It also allows the flavors to meld and deepen. When you’re ready to bake, preheat your oven to 175°C (350°F). Bake for 10-12 minutes, or until the edges are set and lightly golden, and the centers still look slightly soft. The cookies will continue to bake and firm up as they cool on the baking sheet.
- Cooling: Let the cookies cool on the baking sheet for about 5-10 minutes before carefully transferring them to a wire rack to cool completely. This allows them to set up properly. Enjoy your delightful Cookie Monster Cookies! They are best stored in an airtight container at room temperature for up to 3 days.
Conclusion:
These Cookie Monster Cookies are more than just a dessert; they’re an experience. The vibrant blue dough speckled with chocolate chips and cookie crumbles, all surrounding a hidden whole Oreo, makes for a truly memorable treat that’s as fun to look at as it is to eat. They bring a smile to faces, whether you’re a child or an adult who remembers Cookie Monster fondly. The combination of soft, chewy cookie, pockets of melted chocolate, and satisfying crunch from the added cookie bits is simply delightful. Don’t be afraid to get a little messy with the blue coloring – it adds to their charm! These cookies are fantastic on their own, but you can also serve them with a glass of cold milk for the ultimate treat.
Want to mix things up? You can try using different kinds of chocolate chips, like milk or semi-sweet, or swap the Oreos for another type of sandwich cookie. For an extra touch, add some sprinkles to the dough before baking. They store well in an airtight container at room temperature for up to 3-4 days, making them great for making ahead.
Frequently Asked Questions:
Can I make these cookies vegan?
Yes, you can adapt these Cookie Monster Cookies to be vegan. Use vegan butter, a flax egg (1 tablespoon flaxseed meal mixed with 3 tablespoons water, let sit for 5 minutes) or a commercial egg replacer, and ensure your chocolate chips are dairy-free. For the Oreos, regular Oreos are often considered accidentally vegan, but always check the packaging for the most up-to-date information.
Why are my cookies spreading too much?
This usually happens if the butter was too soft or melted, or if there was too much sugar. Make sure your butter is softened, not melted, and accurately measure your sugars. Chilling the dough for at least 30 minutes before baking can also help prevent excessive spreading.
Cookie Monster Cookies
Fun and colorful blue cookies packed with chocolate chips and crushed Oreos, with whole Oreos as a delightful surprise center.
Ingredients
-
120 g (1/2 cup) unsalted butter, softened
-
100 g (1/2 cup) granulated sugar
-
50 g (1/4 cup) light brown sugar
-
1 room temp egg
-
1 tsp vanilla extract
-
Blue gel food coloring
-
230 g (1 3/4 cups) all-purpose flour
-
Pinch of salt
-
1 tsp baking powder
-
1/2 tsp baking soda
-
40 g (1/4 cup) dark chocolate chips
-
40 g (1/4 cup) white chocolate chips
-
30 g (1/4 cup) crushed mini cookies
-
3 Oreos, chopped
-
12 whole Oreos for stuffing
Instructions
-
Step 1
Cream together the softened butter and both sugars until light and fluffy. -
Step 2
Beat in the egg and vanilla extract. Add blue gel food coloring until desired color is reached. -
Step 3
In a separate bowl, whisk together the flour, salt, baking powder, and baking soda. -
Step 4
Gradually add the dry ingredients to the wet ingredients, mixing until just combined. Stir in the dark chocolate chips, white chocolate chips, crushed mini cookies, and chopped Oreos. -
Step 5
Scoop about 2 tablespoons of dough for each cookie. Flatten one portion, place a whole Oreo in the center, and then cover with another portion of dough, sealing the edges to fully encase the Oreo. -
Step 6
Place dough balls onto a baking sheet lined with parchment paper, leaving space between them. -
Step 7
Bake at 350°F (175°C) for 10-12 minutes, or until edges are lightly golden and centers are still slightly soft. -
Step 8
Let cool on the baking sheet for a few minutes before transferring to a wire rack to cool completely.
Important Information
Nutrition Facts (Per Serving)
It is important to consider this information as approximate and not to use it as definitive health advice.
Allergy Information
Please check ingredients for potential allergens and consult a health professional if in doubt.